Ever been caught in a sudden downpour while sailing, or had a small leak spring up unexpectedly? A functioning bilge pump is crucial for every boat owner's peace of mind. And at the heart of a reliable bilge pump system lies the correct wiring. This guide will delve into the intricacies of a 2-wire bilge pump wiring schematic, making sure you're equipped to handle any watery surprises.
Understanding a 2-wire bilge pump wiring diagram might seem intimidating at first, but it's simpler than you think. This setup is the most common for smaller boats and offers a straightforward connection between the pump, the battery, and a float switch. We'll break down each component and how they work together to keep your boat afloat.
Bilge pumps have been a staple in boating for decades, evolving from manual hand pumps to the automatic electric versions we see today. The simplicity and reliability of a 2-wire setup have made it a popular choice. It's critical to grasp the fundamentals of this system to ensure your boat remains safe from unexpected flooding.
One of the main issues boat owners face with their bilge pump systems is incorrect wiring. A poorly connected system can lead to malfunctions, leaving your boat vulnerable. This guide aims to eliminate that risk by providing a clear and concise explanation of the 2-wire bilge pump wiring diagram.
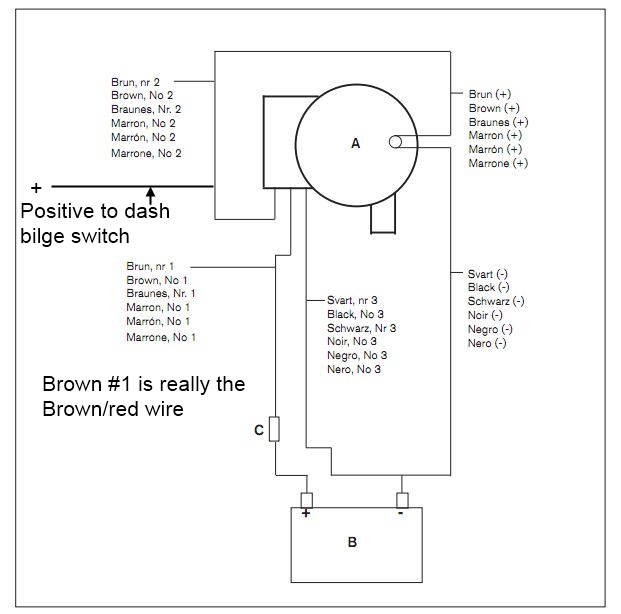
A 2-wire bilge pump system consists of the pump itself, a float switch, and a power source (usually your boat's battery). The float switch acts as the brain of the operation, automatically activating the pump when water levels rise. The two wires connect the pump to the power source, completing the circuit and enabling the pump to remove unwanted water.
A simple 2-wire bilge pump diagram typically involves connecting one wire from the pump to the positive terminal of the battery (often through a fuse) and the other wire to the float switch. The float switch then connects to the negative terminal of the battery, completing the circuit. When the float switch rises with the water level, it closes the circuit, activating the pump. This automatic operation provides continuous protection against flooding.
One significant benefit of a 2-wire system is its simplicity. It’s easy to install and troubleshoot, making it ideal for DIY boat maintenance. Secondly, its relatively low cost compared to more complex systems is a significant advantage for budget-conscious boaters. Finally, the reliability of the 2-wire system ensures consistent performance, offering peace of mind on the water.
Before beginning any electrical work, disconnect your boat's battery. This is crucial for your safety. Consult your boat's manual for specific wiring recommendations. Always use marine-grade wiring and connectors to resist corrosion. Secure all connections with waterproof heat shrink tubing.
Advantages and Disadvantages of a 2-Wire Bilge Pump System:
Advantages and Disadvantages
| Advantages | Disadvantages |
|---|---|
| Simple installation | Limited functionality (no manual override) |
| Cost-effective | Less suitable for larger vessels |
| Reliable operation | Susceptible to float switch failures |
Best practices for a 2-wire bilge pump system include using marine-grade wiring, properly fusing the circuit, regularly inspecting the float switch for debris, testing the system periodically, and ensuring all connections are waterproof.
Frequently Asked Questions:
1. Why is my bilge pump not working? Check the fuse, float switch, and wiring connections.
2. How often should I test my bilge pump? At least once a month.
3. Can I install a 2-wire system myself? Yes, with basic electrical knowledge.
4. What size fuse should I use? Consult your pump manufacturer's recommendations.
5. What type of wire should I use? Marine-grade wire designed for bilge pump applications.
6. Where should I place the float switch? In the lowest part of the bilge.
7. How do I clean the float switch? Remove it and clean with fresh water.
8. What if my bilge pump runs continuously? Check for debris obstructing the float switch.
Tips and tricks: Regularly inspect and clean your float switch. Use a multimeter to test the circuit. Apply dielectric grease to all connections to prevent corrosion.
A properly functioning bilge pump is essential for any boat owner. Understanding the 2-wire bilge pump wiring diagram empowers you to maintain and troubleshoot your system, ensuring a safe and enjoyable boating experience. This guide has provided a comprehensive overview, from basic installation to troubleshooting tips. By taking the time to understand and implement these guidelines, you are taking a proactive step towards protecting your vessel and ensuring peace of mind on the water. Don't underestimate the importance of a well-maintained bilge pump; it could save your boat from unexpected flooding. Regularly inspect your system, follow the best practices outlined above, and address any issues promptly. Safe boating!
The allure of the anime male profile picture
Navigating the steuben county court system in new york
Free cartoon farmer clipart your harvest of hilarious design awaits
How To Wire A Bilge Pump Switch - Khao Tick On
Bilge Pump Float Switch Wiring - Khao Tick On
How To Wire An Automatic Bilge Pump - Khao Tick On
Float Switch Wiring Diagram Boat - Khao Tick On
Attwood Sahara Bilge Pump Wiring Diagram - Khao Tick On
How To Wire An Automatic Bilge Pump - Khao Tick On
Pump Float Switch Wiring Diagram - Khao Tick On
2 wire bilge pump wiring diagram - Khao Tick On
Rule Float Switch Wiring - Khao Tick On
Wiring A Rule Bilge Pump - Khao Tick On
Bilge Pump Switch Wiring - Khao Tick On
Bilge Pump Wiring With Float Switch - Khao Tick On
Bilge Pump Wiring Diagram With Float Switch - Khao Tick On
How To Wire A Bilge Pump Switch - Khao Tick On
Bilge Pump Control Panel Wiring Diagram - Khao Tick On


